Detect DoS attack using a custom rule file in Suricata
5 minutes

In today's digital landscape, cybersecurity is more important than ever. With the rise of online threats, such as Denial of Service (DoS) attacks, businesses and individuals need to be vigilant in protecting their networks. One powerful tool for detecting and mitigating DoS attacks is Suricata, an open-source Intrusion Detection System (IDS).
Suricata is an open-source network Intrusion Detection/Prevention System (IDS/IPS), a threat detection tool developed by OSIF(Open Information Security Foundation) that offers comprehensive security insights into your network.
Apart from IDS/IPS, Suricata also provides comprehensive network security monitoring capabilities by capturing and analyzing network packets, and log events, and can generate alerts about suspicious or malicious activity on the network.
In this blog post, we will explore how Suricata can help you identify and detect to DoS attacks, keeping your network secure and your data safe.
Suricata configuration
Before installing Suricata in Docker, Let's quickly go over a few minimal configuration settings that you need to apply to get it up and running in a containerized environment.
Choose Interface and Network
First, determine the interfaces and IP addresses on which you want Suricata to inspect network packets. Use the following command to view the available interfaces and associated networks in your system.
$ ip addr
If you are interested in monitoring the default interface in your system, find it with the following command.
$ ip -p -j route show default Suricata rule/signature
How suricata detect dos attack ? To detect Denial-of-service(DoS) attacks in your network, you must add rules/signatures that Suricata will use to match against incoming network packets in the configured interface. To understand DoS detection techniques properly, one has to be conscious of Suricata alert rules or signatures.
These signatures or rules are a set of criteria that are matched against incoming network traffic. If Suricata signatures match with incoming network packets then an alert or action is triggered by Suricata.
Suricata rule or signature consists of three parts:
- The action part determines what to do when a rule matches.
- The header part consists of the network protocol, source/destination IP addresses, source/destination ports, and the direction of the rule.
- The rule part defines the specifics of the rule.
For example, in the following signature/rule which is used to detect SYN flood attacks, the action, header, and rule parts are marked as red, green, and blue respectively.

Custom DoS rule
A Denial-of-Service (DoS) attack exhibits in various forms and can target different layers of networks or services. The most common types of DoS attacks are listed below:
UDP Flood: The attacker sends a sizeable number of UDP packets to a target overwhelming its capacity to process them.
TCP SYN Flood: The attacker floods the target with TCP SYN packets, exhausting resources and preventing legitimate connections to other users/clients.
ICMP Flood: The attacker sends a high volume of ICMP Echo Request (ping) packets to the target, consuming enormous bandwidth and resources.
HTTP/S Flood: The attacker floods a web server with a large number of HTTP or HTTPS requests just to consume server resources to crash the HTTP server.
An attacker has a plenty of available options to choose a specific DoS attack but there are plenty of available DoS signatures as well that you can deploy too. To give you a rough estimate of DoS attack signatures for an IDS/IPS system like Suricata, the number can be dozens to hundreds of individual signatures. Here we will define three DoS signatures or rules to detect UDP Flood attack, TCP SYN Flood attack and ICMP Flood attack.
Rule to detect UDP Flood attack
alert udp any any -> any any (msg:"Possible UDP Flood DoS"; threshold: type both, track by_dst, count 200, seconds 1; classtype:attempted-dos; sid:1000055; rev:1;)
Rule to detect TCP SYN Flood attack
alert tcp any any -> $HOME_NET any (msg: "Possible DDoS attack"; flags: S; flow: stateless; threshold: type both, track by_dst, count 200, seconds 5; classtype:denial-of-service; sid:1000001; rev:1;)
Rule to detect ICMP Flood attack
alert icmp any any -> any any (msg:"Possible ICMP Flood DoS"; itype:8; threshold: type both, track by_dst, count 200, seconds 1; classtype:attempted-dos; sid:1000054; rev:1;)
There are a pretty good number of DoS rules available here that you can customize and add to your suricata rule/configuration file. You are free to use all the available DoS signatures/rules to detect any form of DoS attacks in your networks or selectively deploy very specific DoS rules/signatures rather than deploying all the rules.
Install Suricata
You can install Suricata manually from scratch. However, Installing Suricata using Docker will help you deploy and maintain it effortlessly. The folder structure of the Suricata docker configuration file which will be used to install it is given below and is available on GitHub repo.
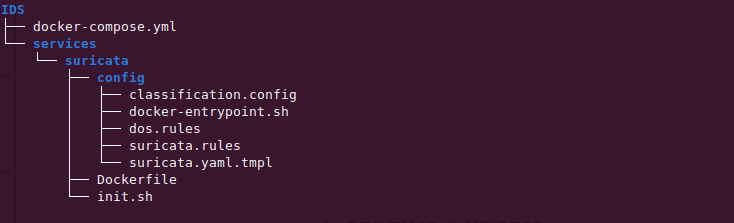
The DoS signatures are defined in the file dos.rules. You can append more DoS signatures or rules in this file or better you can start from scratch by removing existing signatures and adding your own rules in this file.
Clone this repo and adjust the environmental variables declared in the .env file as per your environment.
$ git clone https://github.com/Dwijad/suricata.git
$ cd suricata
$ cat .env
INTERFACE=enx00e096680f85
HOME_NET=[192.168.1.35]
PGID=1000
PUID=1000
COMMUNITY_ID=true
The DoS attack signatures or rules are defined in the file dos.rules file. You can add your own DoS signature/rules in this file. Look at the classification.config file as well for any new rule/signature classification you want to add or modify.
The Suricata built-in signatures/rules are defined in the file suricata.rules
Build/Deploy Suricata
Navigate to the cloned folder and build the Suricata docker image. On successful completion of the docker build command, create a docker container for Suricata. Remember you need docker-compose to proceed with containerizing Suricata given in the next section.
$ docker-compose build  --no-cache suricata
$ docker-compose up -d suricata
$ docker ps -a
$ docker logs -f <suricata_container_id_or_name>
Simulate and Detect DoS attack
Once Suricata is up and running, verify the setup by launching DoS attack on the target network. Let's test the three DoS signatures we have discussed in the previous section starting with launching a TCP SYN Flood attack using hping3.
1. Launch TCP SYN Flood attack using hping3
$ sudo hping3 -S -p 22 --flood --rand-source 192.168.1.35Check the log file
$ tail -f /var/log/suricata/fast.log
2. Launch ICMP Flood attack using hping3
$ sudo hping3 --icmp --flood -c 1000 --spoof 192.168.1.35 192.168.1.255Check the log file
$ tail -f /var/log/suricata/fast.log
3. Launch UDP Flood attack using hping3
$ sudo hping3 --udp --flood -p 80 192.168.1.35Check the log file
$ tail -f /var/log/suricata/fast.log
Conclusion
In this post, we have covered the installation of Suricata using the docker and configured it to act as an IDS. Moreover, this post also shows how to add custom rules to prevent DoS attacks in a network. Although using Suricata as an IDS will not prevent intrusion attempts, one can configure it to act as an Intrusion Prevention System(IPS) to eliminate threats and thereby ensure the safety and integrity of any network infrastructure.
 A Guide to ClickHouse Installation on Ubuntu 22.04 / 24.04 LTS: Step-by-Step Tutorial
15 minutes / Oct ' 03 2024

 How to install, self-host, and Integrate Jira Software and Jira Service Desk in the Cloud
11 minutes / Aug ' 22 2024