How to install and configure Wireguard VPN Server on Almalinux 9 and Rocky Linux 9
14 minutes

Introduction
Wireguard is an extremely lightweight and fast Virtual Private Network (VPN) implemented inside the Linux Kernel. It is a Layer 3(IP) VPN protocol supported by IPv4 and IPv6 and can encapsulate IPv4-in-IPv6 and IPv6-in-IPv4. The WireGuard uses modern and advanced encryption algorithms, including ChaCha20, Poly1305, HKDF, and others to ensure that the connections are highly secure.
The speed and lightweight of WireGuard are due to its implementation in a few lines of (approximately 4k) codes as compared to half a million lines of code in OpenVPN or IPsec/*Swan. This makes the auditing and configuration of WireGuard code extremely easy even for a single individual while still being secure and extremely fast.
The main focus of WireGurad is its simplicity and an easily auditable codebase. The simplification is achieved through implementing the protocol in layer 3 by bridging multiple IP networks. In comparison, OpenVPN operates at layer 4 and utilizes an older but secured SSL library, which significantly slows down its speed and falls short of WireGuard's performance.
This article will cover installation and configuration of WireGuard VPN server on AlmaLinux 9 and Rocky Linux 9 followed by configuring a Linux client and an Android client to connect to the WireGuard server. Additionally, this article will delve on how to configure a WireGuard VPN client in split tunnel mode to route peer traffic to only the selected subnet.
Prerequisites
To install WireGuard VPN on AlmaLinux 9 or Rocky Linux 9, ensure you meet the following requirements.
- A running local or cloud instance of AlmaLinux 9 or Rocky Linux 9.
- SSH access to the server with sudo privilege.
Install WireGuard on AlmaLinux 9 or Rocky Linux 9
The WireGuard is a new VPN protocol and is now integrated into the Linux kernel starting with version 5.6. It was first released by Jason A. Donenfeld in 2015 as an alternative to other VPN protocols such as IPSec, OpenVPN, and IKEv2.
The latest release of AlmaLinux 9 and Rocky Linux 9 is shipped with default Linux kernel 5.14 and has the WireGuard kernel module embedded in it. Therefore, technically, you do not have to install the WireGuard separately; you enable the WireGuard kernel module in AlmaLinux 9 or Rocky Linux 9.
To enable the WireGuard kernel module, use the following modprobe command and verify whether the module has been enabled using the lsmod command.
$ sudo modprobe wireguard
$ lsmod | grep wireguard
wireguard             118784  0
ip6_udp_tunnel         16384  1 wireguard
udp_tunnel             28672  1 wireguard
curve25519_x86_64      36864  1 wireguard
libcurve25519_generic    49152  2 curve25519_x86_64,wireguard
To load the WireGuard kernel module permanently during system boot add a new config file under /etc/modules-load.d/ directory.
$ sudo bash -c 'cat << EOF > /etc/modules-load.d/wireguard.conf
wireguard
EOF'
The WireGuard server has been enabled however, you need to install the wireguard-tools package to manage it from the command line interface.
$ sudo dnf install wireguard-toolsAt this moment, the WireGuard server is activated on your server and is ready to be configured with the help of the WireGuard tools.
Generate WireGuard Server Key Pair
Create a directory for the WireGuard server public and private keypairs and execute the following command wg genkey to generate key pair. Make sure to update the default permissions of this folder to disable all other permissions for groups other than the owner.
$ wg genkey | sudo tee /etc/wireguard/server.key
cLLhEID20orzsZWNn9Cr7pEosIr6sC/yUdBrkdzo7WU=
$ sudo chmod 400 /etc/wireguard/server.key
Fetch the public key and send it to the file server.pub.
$  sudo cat /etc/wireguard/server.key | wg pubkey | sudo tee /etc/wireguard/server.pub
U/ut5o3uxRON2WGNUiz8bpavboj1ghJvy581/eN54Vs=
Similarly, generate a key pair for a client in a new folder. We will reference the key pair in the WireGuard client configuration at a later stage.
$ sudo mkdir -p /etc/wireguard/clients
$ wg genkey | sudo tee /etc/wireguard/clients/client1.key
4MjzXPh/eX6UpNBT6ndAL9TgsBB1Nvir2Qf1iTrPoHw=
$ sudo cat /etc/wireguard/clients/client1.key | wg pubkey | sudo tee /etc/wireguard/clients/client1.pub
YNpRwLuJfmkkCQG+3/ziIICZKpxXWajvoRjsLPtHQ1M=
Open WireGuard Port in Firewall
Next setup the firewalld on the WireGuard server to route specific traffic from wireguard clients to the interface of the WireGuard server. For that, the iptables script in the firewalld will be used by the PostUp and PostDown shell script which we have listed in the previous section. Install and start the firewalld with the following set of commands.
$ sudo dnf install firewalld
$ sudo systemctl enable firewalld
$ sudo systemctl start firewalld
Now open the WireGuard port on firewalld.
$ sudo firewall-cmd --add-port=51820/udp --permanent
success
$ sudo firewall-cmd --reload
Make sure to update SELINUX mode to permissive by editing the file /etc/selinux/config.
$ sudo vi /etc/selinux/config
...
...
SELINUX=permissive
...
...
To make the SELINUX settings permanent, reboot the system.
Create WireGuard configuration file
In this step, create a WireGuard configuration file to setup the WireGuard tunnel interface and a peer connection for a client. The wireguard config includes allocating unique IPv4 and IPv6 local addresses for the Wireguard VPN subnet, assigning private key of WireGuard server and public key of client and few other parameters.
$ sudo vi /etc/wireguard/wg0.conf
[Interface]
Address = 10.20.20.1/32
Address = fd42:42:42::1/64
SaveConfig = false
ListenPort = 51820  ← The WireGuard servers UDP port.
PrivateKey = cLLhEID20orzsZWNn9Cr7pEosIr6sC/yUdBrkdzo7WU=   ← The servers Private key (server.key).
PostUp = /etc/wireguard/postup.sh
PostDown = /etc/wireguard/postdown.sh
[Peer]
PublicKey = YNpRwLuJfmkkCQG+3/ziIICZKpxXWajvoRjsLPtHQ1M=  ← The Public key of client (client1.pub).
AllowedIPs = 10.20.20.2/32,fd42:42:42::2/128   ← IP addresses the Peer/VPN client is allowed to use. Different for each peer.
The PostUp and PostDown lines in the WireGuard config file define the steps needed to run after the tunneled interface is switched off and on. In the PostUp step, we have defined the iptables rule to set IP masquerade to allow the clients to share the IPv4 and IPv6 addresses of the WireGuard server. These rules will be cleaned up once the tunnel is down.
Create two shell scripts containing all the firewalls rules needed for PostUP and PostDown operation. Adjust the masquerade interface name with the default interface of the Wireguard server. So firstly, get the default interface name of the server with the following command.
$ ip route show default
default via 172.26.0.1 dev eth0 proto dhcp src 172.26.2.172 metric 100
Add the firewall rules for the PostUp operation.
$ sudo vi /etc/wireguard/postup.sh
WG_INTERFACE=wg0
WG_LAN=10.20.20.1/24
MASQUERADE_INTERFACE=eth0
sudo iptables -t nat -I POSTROUTING -o $MASQUERADE_INTERFACE -j MASQUERADE -s $WG_LAN
# Add a WG_wg0 chain to the FORWARD chain
CHAIN_NAME="WIREGUARD_$WG_INTERFACE"
sudo iptables -N $CHAIN_NAME
sudo iptables -A FORWARD -j $CHAIN_NAME
# Accept related, established traffic
sudo iptables -A $CHAIN_NAME -o $WG_INTERFACE -m conntrack --ctstate RELATED,ESTABLISHED -j ACCEPT
# Accept traffic from any Wireguard subnet connected to the Wireguard server
sudo iptables -A $CHAIN_NAME -s $WG_LAN -i $WG_INTERFACE -j ACCEPT
# Drop everything else coming through the Wireguard tunnel interface
sudo iptables -A $CHAIN_NAME -i $WG_INTERFACE -j DROP
# Return to FORWARD chain
sudo iptables -A $CHAIN_NAME -j RETURN
Next add the firewall rules to clean up the rules enabled by the PostUp operation.
$ sudo vi /etc/wireguard/postdown.sh
WG_INTERFACE=wg0
WG_LAN=10.20.20.1/24
MASQUERADE_INTERFACE=eth0
CHAIN_NAME="WIREGUARD_$WG_INTERFACE"
sudo iptables -t nat -D POSTROUTING -o $MASQUERADE_INTERFACE -j MASQUERADE -s $WG_LAN
# Remove/delete the chain WG_wg0
sudo iptables -D FORWARD -j $CHAIN_NAME
sudo iptables -F $CHAIN_NAME
sudo iptables -X $CHAIN_NAME
Assign execute permission to the shell scripts.
$ sudo chmod u+x /etc/wireguard/postup.sh /etc/wireguard/postdown.shStart the WireGuard VPN server and enable it during boot.
$ sudo systemctl start wg-quick@wg0.service
$ sudo systemctl enable wg-quick@wg0.service
$ sudo netstat -plun
Proto Recv-Q Send-Q Local Address           Foreign Address         State       PID/Program name
udp        0      0 0.0.0.0:51820           0.0.0.0:*                           -
...
...
Enable IP forwarding in the WireGuard server
Any VPN server needs to route packets between clients and the internet and so does the WireGuard. To enable IP forwarding for both IPv4 and IPv6, add the following two lines in /etc/sysctl.conf.
$ sudo vi /etc/sysctl.conf
# Port Forwarding for IPv4
net.ipv4.ip_forward=1
# Port forwarding for IPv6
net.ipv6.conf.all.forwarding=1
To apply changes, run the following sysctl command.
$ sudo sysctl -p
net.ipv4.ip_forward = 1
net.ipv6.conf.all.forwarding = 1
Install Bind(DNS resolver) in the server
We will also install a DNS server for WireGuard which will be used by the VPN clients as a local nameserver to resolve domain names. This DNS server will function as a WireGuard DNS server for VPN clients.
First, install the bind9 DNS server and enable auto start at boot time.
$ sudo dnf install bind
$ sudo systemctl enable named
Edit the bind9 configuration file to allow clients from entire VPN subnet (10.20.20.1/24) to query domain names. To do that comment the two listen directive by adding a double slash at the begining of the line and add the VPN subnet(10.20.20.0/24) in the allow-query field.
$ sudo vi /etc/named.conf
//listen-on port 53 { 127.0.0.1; };
//listen-on-v6 port 53 { ::1; };
...
...
...
allow-query     { localhost; 10.20.20.0/24; };
Restart the bind9 nameserver and open bind9 port(53) on firewalld.
$ sudo systemctl restart named
$ sudo firewall-cmd --add-port=53/udp --permanent
$ sudo firewall-cmd --reload
Test the local nameserver by resolving a domain name.
$ nslookup google.com 10.20.20.1At this stage, the WireGuard VPN server setup is complete. To connect to the WireGuard server, you will need to configure WireGuard client in the client machines, the steps of which are given in the next section.
WireGuard Peer configuration
1. Linux Client(Ubuntu)
Its time to configure a WireGuard peer - a local Ubuntu 22.04 Jammy Jellyfish, to connect to the WireGuard server. Firstly, Install the WireGuard tools package which contain all the tools needed for configuring a WireGuard Linux client. Alongside the WireGuard tool, install the resolveconf package which will be used by the WireGuard client to push nameserver in /etc/resolv.conf propagated by the WireGuard VPN server. The nameserver configuration will be cleaned up by resolvectl once the client disconnects from the WireGuard server.
$ sudo apt install wireguard-tools resolvconf
$ sudo ln -s /run/resolvconf/resolv.conf /etc/resolv.conf
$ sudo systemctl restart systemd-resolved
$ sudo systemctl enable systemd-resolved
Next configure network manager setting to prevent it from updating /etc/resolv.conf.
$ sudo vi /etc/NetworkManager/NetworkManager.conf
[main]
#plugins=ifupdown,keyfile
dns=none ← Update here.
#[ifupdown]
#managed=false
#[device]
#wifi.scan-rand-mac-address=no
Restart the Network manager.
$ sudo systemctl restart NetworkManagerCreate a WireGuard Ubuntu client configuration file with the name wg0.conf. The name of the network interface will be wg0 matching with the file name.
$ sudo vi /etc/wireguard/wg0.conf
[Interface]
# Define the IP address for the client matching with wg0 on Wireguard Server.
Address = 10.20.20.2/24, fd48:b57b:63f8::2/128 ← Local IPv6 address of the client. Increase the count by one for each client. For example, use ::3/128 for next client and so on.
# Private key for the client(client1.key).
PrivateKey = 4MjzXPh/eX6UpNBT6ndAL9TgsBB1Nvir2Qf1iTrPoHw=
# Local DNS server.
DNS = 10.20.20.1
# Run resolvectl command.
PostUp = resolvectl dns %i 10.20.20.1; resolvectl domain %i ~.
PreDown = resolvectl revert %i
PostUp = iptables -A FORWARD -i wg0 -j ACCEPT; iptables -t nat -A POSTROUTING -o wlp0s12f0 -j MASQUERADE; ip6tables -A FORWARD -i wg0 -j ACCEPT; ip6tables -t nat -A POSTROUTING -o wlp0s12f0 -j MASQUERADE
PostDown = iptables -D FORWARD -i wg0 -j ACCEPT; iptables -t nat -D POSTROUTING -o wlp0s12f0 -j MASQUERADE; ip6tables -D FORWARD -i wg0 -j ACCEPT; ip6tables -t nat -D POSTROUTING -o wlp0s12f0 -j MASQUERADE
[Peer]
# Public key of the Wireguard server(server.pub).
PublicKey = U/ut5o3uxRON2WGNUiz8bpavboj1ghJvy581/eN54Vs=
#AllowedIPs = 10.20.20.1/32, fd48:b57b:63f8::/64 ← In case of split tunnel, use this option.
#Allow all traffic to be routed via Wireguard VPN
AllowedIPs = 0.0.0.0/0, ::/0
# Public IP address of the Wireguard Server
Endpoint = 54.169.119.101:51820
# Sending Keepalive every 25 sec
PersistentKeepalive = 25
This is your complete WireGuard config file for Linux client. The default interface name used in PostUp and PostDown operation is wlp0s12f0. Adjust the interface name with default interface name of your client using the command ip route show default.
We have already added this peer to the WireGuard server configuration file /etc/wireguard/wg0.conf previously. The WireGuard server should have the peer configuration for each client under [peer] setting.
Bring up the WireGuard tunnel interface.
$ sudo wg-quick up wg0
[sudo] password for dwija:
[#] ip link add wg0 type wireguard
[#] wg setconf wg0 /dev/fd/63
[#] ip -4 address add 10.20.20.2/24 dev wg0
[#] ip -6 address add fd42:42:42::2/128 dev wg0
[#] ip link set mtu 1420 up dev wg0
[#] resolvconf -a tun.wg0 -m 0 -x
[#] wg set wg0 fwmark 51820
[#] ip -6 route add ::/0 dev wg0 table 51820
[#] ip -6 rule add not fwmark 51820 table 51820
[#] ip -6 rule add table main suppress_prefixlength 0
[#] nft -f /dev/fd/63
[#] ip -4 route add 0.0.0.0/0 dev wg0 table 51820
[#] ip -4 rule add not fwmark 51820 table 51820
[#] ip -4 rule add table main suppress_prefixlength 0
[#] sysctl -q net.ipv4.conf.all.src_valid_mark=1
[#] nft -f /dev/fd/63
[#] resolvectl dns wg0 10.20.20.1; resolvectl domain wg0 ~.
[#] iptables -A FORWARD -i wg0 -j ACCEPT; iptables -t nat -A POSTROUTING -o wlp0s12f0 -j MASQUERADE; ip6tables -A FORWARD -i wg0 -j ACCEPT; ip6tables -t nat -A POSTROUTING -o wlp0s12f0 -j MASQUERADE
Validate the WireGuard Ubuntu tunnel interface.
$  ip a show wg0
52: wg0: <POINTOPOINT,NOARP,UP,LOWER_UP> mtu 1420 qdisc noqueue state UNKNOWN group default qlen 1000
   link/none
   inet 10.20.20.2/24 scope global wg0
      valid_lft forever preferred_lft forever
   inet6 fd48:b57b:63f8::2/64 scope global
      valid_lft forever preferred_lft forever
Validate the DNS settings.
$ resolvectl status wg0
Link 52 (wg0)
   Current Scopes: DNS
        Protocols: +DefaultRoute +LLMNR -mDNS -DNSOverTLS DNSSEC=no/unsupported
Current DNS Server: 10.20.20.1
      DNS Servers: 10.20.20.1
       DNS Domain: ~.
Ping the name server aka WireGuard VPN server.
$ ping 10.20.20.1
PING 10.20.20.1 (10.20.20.1) 56(84) bytes of data.
64 bytes from 10.20.20.1: icmp_seq=1 ttl=64 time=198 ms
64 bytes from 10.20.20.1: icmp_seq=2 ttl=64 time=138 ms
64 bytes from 10.20.20.1: icmp_seq=3 ttl=64 time=227 ms
2. WireGuard Android Client
This section will show you how to configure a WireGuard android client in your handset. First download and install WireGuard app from the playstore. The easiest way to import a WireGuard android client configuration is by generating a QR code in the WireGuard server.
In the WireGuard server, install the package qrencode.
$ sudo dnf -y install epel-release
$ sudo dnf -y install qrencode qrencode-libs
Before generating QR code from the configuration file of android client, create the key pair for the android client.
$ wg genkey | sudo tee /etc/wireguard/android_private.key | wg pubkey | sudo tee /etc/wireguard/android_public.key
RnvdkU3ChZVD8KCKl1P/IKKFkE7pIBt44FH8oVtwfQ4=
Get the private key of android client from the file /etc/wireguard/android_private.key. Next create a configuration file for the android client.
$ sudo vi /etc/wireguard/android.conf
[Interface]
Address = 10.20.20.3/24, fd42:42:42::3/128 ← The IPv6 address of android client ..::3/128
DNS = 10.20.20.1
#DNS = fd42:42:42::1
PrivateKey = uD1/n/eLo1wylWxX43czgzIzqW+mBkdo4m9HS5ZX4lo= ← private key of Android client.
[Peer]
PublicKey = U/ut5o3uxRON2WGNUiz8bpavboj1ghJvy581/eN54Vs= ← Public key of WireGuard server.
AllowedIPs = 0.0.0.0/0,::/0 ← All traffic should route over VPN(Not a split tunnel).
Endpoint = 54.169.119.101:51820
PersistentKeepalive = 25
Now run the following command to generate QR code from the wireguard config file for Android.
$ sudo cat /etc/wireguard/android.conf | qrencode -t ansiutf8Next, scan the QR code from the terminal using the android WireGuard app to import the configurations present in the file /etc/wireguard/android.conf to the WireGuard android client.
Once you have added the android client configuration in your handset, append an entry for the client in the WireGuard server configuration file under a [peer] setting.
$ sudo vi /etc/wireguard/wg0.conf
...
...
[Peer]
# Android client.
PublicKey = RnvdkU3ChZVD8KCKl1P/IKKFkE7pIBt44FH8oVtwfQ4=
AllowedIPs = 10.20.20.3/32,fd42:42:42::3/128
...
...
Restart the WireGuard server.
$ sudo systemctl restart wg-quick@wg0.serviceNow in the android client, bring up the WireGuard tunnel interface by tapping the interface name in the WireGuard app.
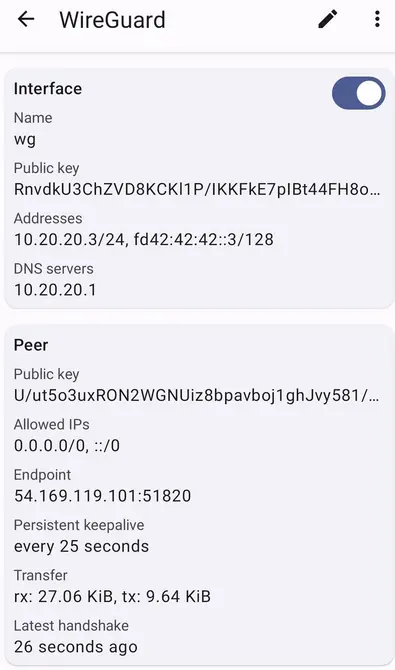
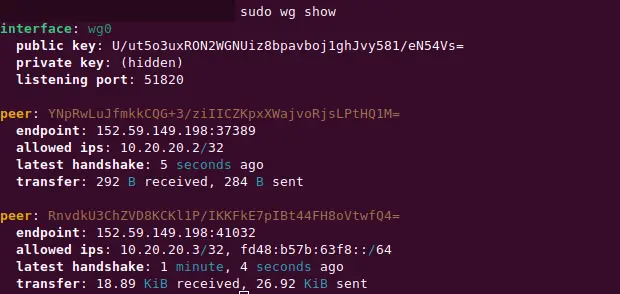
To view all the WireGuard connected peers, run the command sudo wg show on the WireGuard server.
WireGuard Split tunnel
The split tunnel is a mechanism for routing only the necessary traffic over the VPN tunnel. For example, you can interconnect virtual private servers using split tunnel but use the internet normally without a VPN otherwise.
In WireGuard, you can implement split tunneling using AllowedIPs parameter in the client configuration.
For example, to implement a full tunnel in WireGuard, you will use the following configuration in the client config.
AllowedIPs = 0.0.0.0/0To implement a split tunnel, you specify the private IP range where traffic will be routed through the VPN tunnel.
AllowedIPs = 10.20.20.3/32, fd42:42:42::3/128 This line in the client configuration controls tunneling method - a full tunnel or a split tunnel.
The WireGuard VPN is a peer-to-peer protocol, therefore by specifying subnets in the AllowedIPs section you can realize WireGuard site to site VPN.
WireGuard DNS leak test
It's crucial that you check your WireGuard VPN server for any DNS leaks that your ISP provides. Using a VPN that leaks DNS over the internet is pointless. We will use Wireshark to capture packets and analyze for any DNS leaks in our Linux client but first install it using the following command.
$ sudo apt install wiresharkLaunch Wireshark without VPN connection and choose the default interface (wlp0s12f0) that you have used in the WireGuard Linux client configuration previously. Start capturing packets with Wireshark. Simultaneously, in another terminal, ping a domain say wikipedia.org. Stop the capture and select Edit-> Find packet and search the term 'wikipedia.org'.
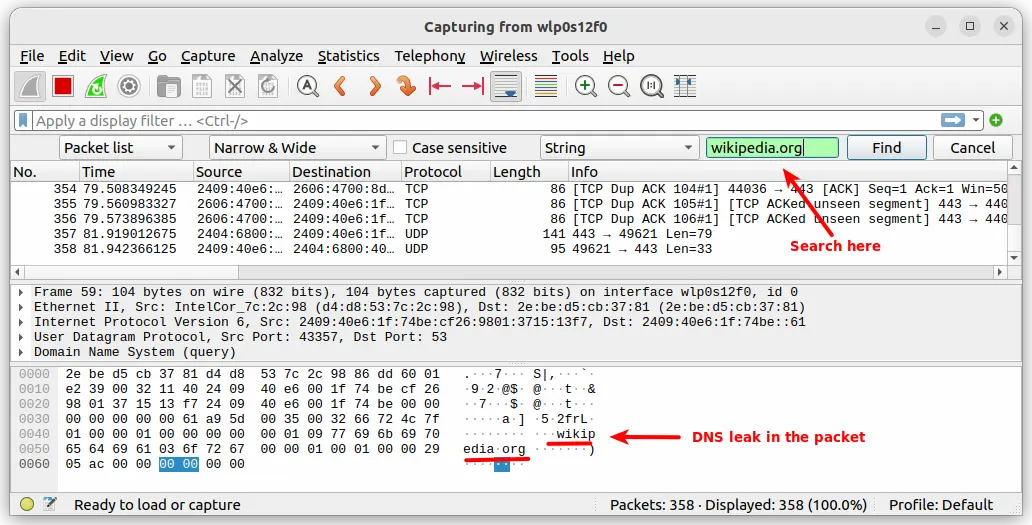
The search will locate the phrase wikipedia.org, indicating a DNS leak. Now bring up the WireGuard tunnel interface and start capturing packet again. Ping the site and stop the capture. Like before search again for the term wikipedia.org in the Wireshark interface.
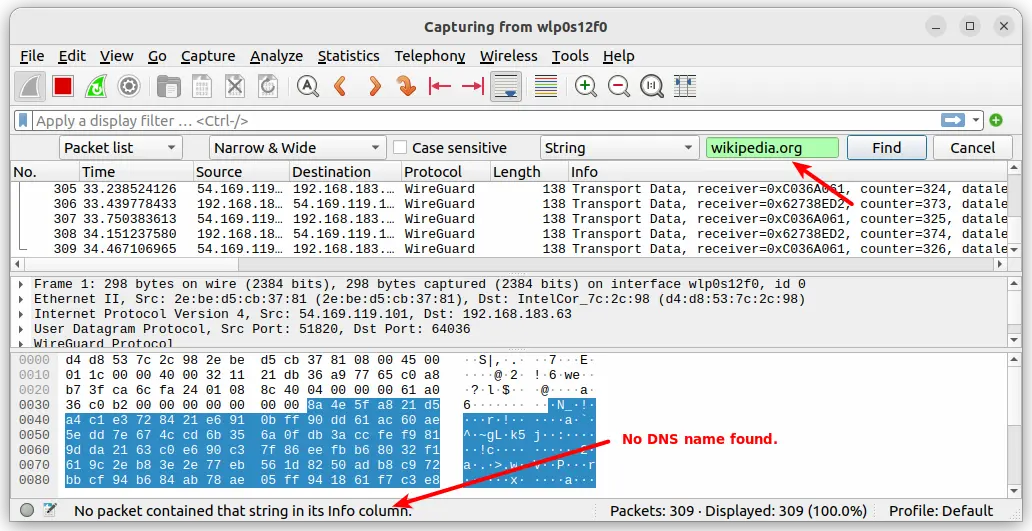
If you have configured your WireGuard server correctly, you will not find the search phrase 'wikipedia.org' indicating there is no DNS leaks.
Additionally, you can check out any of these sites - vpninsights.com, ipleak.net, or dnsleaktest.com , to perform a DNS leak test on your WireGuard VPN server.
Conclusion
In this guide, you have learned how to setup a WireGuard Virtual private network(VPN) server in AlmaLinux 9 and Rocky Linux 9. You have also learned how to configure a Linux client and an Android client to connect with the WireGuard server. Additionally, a DNS leak test using Wireshark given at the end of this post will guide you to configure a WireGuard server without any DNS leaks.
The WireGuard VPN is good for personal devices or for site to site VPN. However WireGuard does not support DHCP and allows regular user name, password based logins. You need to configure WireGuard on a per device basis and may not be an ideal choice for corporate remote VPNs. The main advantage of WireGuard VPN is that it is incredibly fast and can be configured with few parameters quickly. You do not need to configure a WireGuard server with scores of options like OpenVPN.
 Install and Configure Shadowsocks with Cloak: A fast, secure Open-source tunnel proxy to bypass firewalls
12 minutes / Mar ' 18 2025